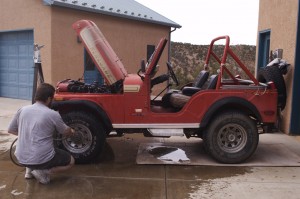
 PART ONE: This is the start of Keith’s pet project. He is restoring a 1976 Jeep CJ-5 Levi edition. It all began in the summer of 2009 when we decided to buy his dad’s old hunting Jeep. We were hoping to turn it into a tow vehicle behind our RV for those times when we need a more nimble vehicle. Also, we thought it would be fun to restore an old beat up Jeep to almost new looking. After talking with his father about the possibility of buying it from him we discovered he had already sold it to a hunting buddy on a nearby ranch. Oh well, we thought. We’ll just go search E-bay or Craiglist and keep our fingers crossed. A few days later his father calls us, tells us the guy who bought the Jeep was looking to sell it so Keith’s father bought it back for us and we reimbursed him. What luck! After a quick trip to Dallas, we pick up the Jeep and tow it back to NM. Now the fun begins. I should mention that the Jeep was running, roughly, but running indeed. Prior to towing it back, we discovered that the gas tank had a leak. It was not a really bad leak but still dripping. OK, no problem. We’ll just drain the tank before we hit the road. Well, I guess we didn’t get it completely drained because we saw a little trail every time we stopped somewhere. Oh bother. Anyway, here is Keith washing off all the dirt and grime not long after we brought it home. Aren’t they cute? Oh, I forget to mention something else. There was only a bikini top when we got it (and not in great condition, either). No doors, windows or full top. Makes for a chilly ride.
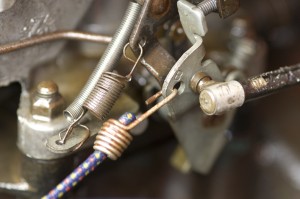
PART TWO: Let’s take a look at the inside – at the engine compartment. Oh goodness, where to even begin. Well, I don’t know that much about cars but I’m pretty sure a bungee cord does not belong anywhere near these parts. In fact, the only place a bungee cord belongs on a car is in the cargo hold to HOLD CARGO NOT ENGINE PARTS. What else? Ah yes, the battery. Hmmm, I always put my battery on a handmade, wooden block of wood and stuff a phone book behind it to help keep it in place. Don’t you? But, that’s not all. Behind the carburetor and under the air filter Keith finds out that the choke has been wired to the back up lights. You know what I’m talking about. The white lights that come on when you shift into reverse. Yeah, again I don’t know much about cars but that doesn’t seem right to me. No wonder the carburetor had to be rebuilt twice and the Jeep was so cold natured. The auto choke wouldn’t work unless you were in reverse. What kind of redneck car did we get? The best part is that a mechanic has worked on this vehicle… TWICE. I don’t think I would be going back to that mechanic. I won’t get into how many parts were not wired or labeled right when Keith started installing the new wiring harness but let’s just say the mechanics manual he had was not all that helpful in the beginning and he did a LOT of hands on learning.
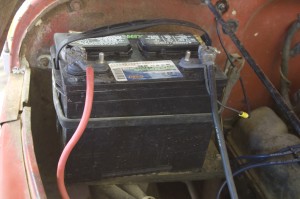
Here is a close up of the battery mentioned above. I forgot to mention that the battery itself had a big nick in it although from what and how we do not know. If you look closely, you will notice the phone book propped behind the battery. Classy. In the gallery you will find a battery series and I included the priming and painting Keith did for the battery area so you can see the before and after. This paint job was done with specialized spray paint prior to him buying a professional grade car paint sprayer.
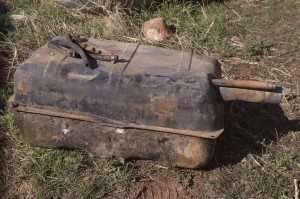
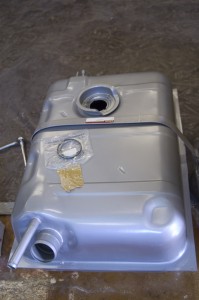
PART THREE: Alrightly then, now that you have a little introduction and background information about our Jeep let’s get started. Our first project (OK, KEITH’S first project) was to replace the gas tank. If you recall from earlier in this journey, the gas tank was leaking slightly when we picked it up. After removing it, we found out why. It had been patched, badly, not once, not twice but three, count it, THREE times and did I mention the rust factor? I’ll let the picture speak for itself. It sums up the condition of the gas tank rather well. Needless to say, this was our first purchase after the Jeep itself.
Was I lying? Well, after the new gas tank arrived Keith soon discovers that it is a slightly different size than the older one. He believes that the old tank was a Jeep model tank, possibly even the original tank but he had a difficult time installing the new tank as it was just slightly larger and didn’t want to fit into place. Just for your information, we did purchase a Jeep gas tank for our particular year and model of Jeep. No worries, after lots of grunting and swearing, as you may expect, he was able to get the tank up and bolted into place. YAY!
Isn’t the new tank nice and shiny?! We like new and shiny. OH MY GOSH, I almost forgot the best part of the fuel tank story. The old tank wasn’t even being held in by anything. Oh wait, that’s not quite right. While the straps were all gone, it was being held in place by the fuel hoses. Silly me. We had nothing to worry about. No need to be concerned, we have the required and necessary straps in place now along with new, long bolts. Prior to installation, Keith wire brushed the skid plate (it protects the gas tank) to remove most of the rust, primed and painted it. We need a new fuel sender unit, too, as it’s really old and not functioning (like this surprises us).
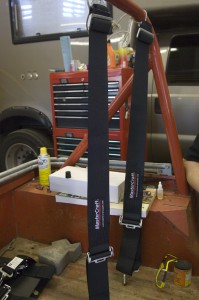
PART FOUR: Time for a little cosmetic surgery and safety. If you haven’t figured out by now, this year and model of Jeep didn’t come with much in the way of safety and less than that by the time we got it. We have no intention of trying to figure out a way to install airbags but there is something else we did. In addition to the roll bar, that did come equipped with the car, we bought and installed a 5 point harness restraining system (similar to what they use in the auto races). We ain’t going anywhere should this baby roll and we won’t be eating the steering wheel in case of an accident. All good things.The image provided here only shows the over the shoulder straps. There is a lap belt with emergency release and a strap that goes between your legs to be installed. If you don’t know, the strap between your legs will help keep you from sliding down the seat and thru the lap belt onto the floor board. That would be bad.
That’s enough of safety. Let’s move onto the cosmetic surgery portion of this epic tale. Since we have plans to buy and install new seats, new top and doors we decide it would be best to go ahead and paint the inside of the tub. We really aren’t that concerned with how the Jeep looks right now. Our goal is to have it mechanically running, safe and sound. But, if we are going to be adding the previously mentioned items then it would make sense to get the inside painted now. First step, Keith begins the process of wire sanding the metal to make everything smooth. Second, he cleans up the mess that he made and does his best to rust off and bondo the holes in the metal sheeting. Thirdly, he cleans again then starts priming. At this point in the game, he already bought a professional grade spray painter from an auto body shop and was able to match the color to the orignial 1976 color the car was once painted. Awesome! If you’re curious, the paint color is called Firecracker Red. The reason we have decided to go with seats and top should be obvious. Once we get this sucker running, we want to be comfortable and protected from the elements. Plus, the new seats will be much safer but we’ll talk about that later.
PART FIVE: More painting and destroying. BUT, before I progress I need to digress (to yesterday’s post). The painting job I mentioned yesterday was not quite all correct. The primer and floor board paint job was done with the specialized cans of spray paint initially bought at the beginning of the project and not done with the spray gun. Also, bear with me as some of today’s story is a little out of sync but does, essentially, all tie in together. Basically, it will all make sense in the end. Finally, I’m not sure how all of these postings look, cosmetically, as I don’t seem to have much control over the layout, for some reason. I think it’s a matter of continuing to play with this new program and web site. I’m sure you all understand and thank you for that.
By the way, this is one stripped down jeep.
Keith has purchased the pro paint sprayer now and this makes the painting job much easier, especially once he made a few mistakes and started to get a feel for how the sprayer worked. I think he only had to paint some of the parts twice because of drips. Oh, and the best part about this process was the day he got the sprayer figured out and did a fabulous job painting the dash. He just finished when not even 10 minutes later, the clouds rolled in and it began to snow. No joke! We have the neatest looking finish now on the dash that nobody could ever duplicate. Yes, we left the snow pock marks on it. But, it was a gentle snow.
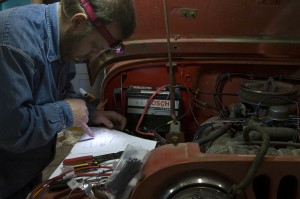
PART SIX: OK, I can’t quite remember what came next: the seats or the wiring harness. We bought the seats and harness at the same time but I remember the seats staying in their box for awhile before installation. In fact, I’m pretty sure the wiring harness came next. That way Keith could have full access to the dashboard and floor boards without having to worry about ruining the seats and such. He installed an oil sender unit at one point, too. Now, the wiring harness was a really fun job. The new harness was beautifully labeled with perfect instructions for anyone to be able to follow assuming the folks who worked on this Jeep before had any clue at all what they were doing and didn’t just randomly wire things to other random things until it worked. It took Keith hours to figure out where some of the previous wires were going, how to get them out and the new ones installed. In addition to figuring out what odd parts the previous “mechanics” decided to throw in for kicks. Oh, yes, it was a fun job indeed. I’m glad I wasn’t in the garage for most of that process.
He did, eventually, get everything wired properly and we have wires that we don’t have gadgets for, yet, but hope to add one day. I’m sure there are other stories to this tale but he’s not here at the moment to verify or correct. If there is anything new to add, I will have him type the addendum. Lights. Check. Wipers. Check. Heat. Check (no ducts or venting but we have heat). One little problem. There seems to be an electrical leak somewhere because the battery drained overnight. He found one issue (of course, I forgot what it was now so we’ll add it later). He fixed that, recharged the battery and it drained again. A few days later of not being able to keep the battery charged Keith buys some volt thing to check stuff out (don’t you love my technical terms when he’s not around)? Alternator seems to be working fine. He is not sure what’s happening. He did read on-line that once a battery has been drained it can have behavior problems. OK, start simple. We return the battery, find out it’s defective and get it replaced for free as it’s still covered by warranty. Yay! Keith has a battery saver thingy from another project that he put on the new battery to keep it from draining completely, just in case. If the battery drops below a certain voltage then this device shuts everything off so you can always get your car started. It’s not long before he discovers that there is still a leak somewhere because his little device keeps kicking in to save the battery. Good for the device, bad for the problem. He’s still working on this issue at the moment. But, the Jeep does run now.
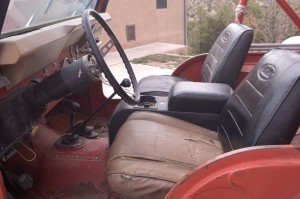
PART SEVEN: Let’s find a place to sit now. Today, Keith installs the new seats. I know that I told you about the old gas tank only being held in place by the fuel hoses but I don’t think I mentioned that the seats were held in place by just a couple of bolts. There are supposed to be, at least, 4 bolts for each seat to hold it securely in place in case of an accident. However, these seats were missing not only a few bolts but most didn’t even have washers or nuts to hold the bolts in place. And, if memory serves, on wasn’t even a bolt. It was some sort of table screw or some other substitute that was not supposed to be there. Again, this project has been just amazing in the wrong things we have discovered about this vehicle.
You will notice in this picture of the old seats that, besides the bolt issue, they are only half back seats which would provide no neck or back support in the prevention of whip lash. They are torn up a bit, too, but that was to be expected. I forgot to mention that we bought a new shifter knob as the old one kept popping off in our hands every time we tried to shift. The only issue we have with the new knob is there are no gear markings so, being a 3 speed, especially, you need to remember that reverse is up and 1st gear is directly down from that. We will change this, I’m sure, even if it means we have to etch them in ourselves. Why not put our only little touch of redneck on it? And, Keith installed side mirrors, which it never had before. We discovered something about the mirrors on our first test drive. The wind likes to blow them around. Oh well. We don’t need no stickin’ mirrors.
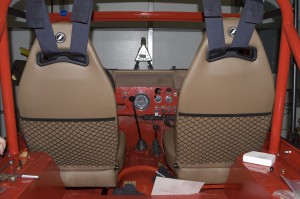
But, back to the seats. These new seats are not only safer (and installed properly with all the required bolts) but so very comfy! And look, a handy mesh pocket on the back to store maps or trash. I guess it will depend upon who is driving at the time. Notice, too, the nice cut outs for the 5 part harness to slip through. We tried to think of everything. We chose tan since the original colors, that we can best find, were red and gold or red and tan. Plus, they will be cooler in the summer time. Tomorrow, it gets a roof.
PART EIGHT: Who wants some shelter? We do, we do! Today is the day Keith installs the new soft top and soft doors. Again, we went with tan to best match the original look. Being a Levi edition, the Jeep would have come with a denim top, maybe even tan denim but we can’t find those anywhere. So, a regular tan soft top that fits this year model will have to work. If you remember back to the beginning of this story, the Jeep only had a bikini top when we picked it up and it was kinda ratty. We still have that top and if we can, at some point, we (meaning Keith) will look into patching it so we can have a choice for a little while longer. Although, I don’t know how much longer the bikini top will last. I guess it depends on the amount of damage.
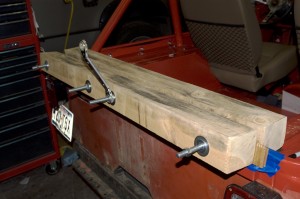
So, the first step for installing the new top is to install the new hardware. Right? Wrong. Keith’s first step, like so many first steps on this project, involves fixing the broken stuff and re-doing the rigged job that occurs over and over on this vehicle, attempting to make it right or more correct.Therefore, Keith’s first step was to make his own vice of sorts so he could straighten out the tailgate. Otherwise, the new hardware won’t go into place. This meant using 2 2×4’s (I think. Just check the picture) and affixing them to the tailgate area, after having removed the spare tire fixture. Then, you slowly begin to tighten (somehow) until the tailgate begins to flatten out. It is Keith’s impression that one of the previous drivers backed into something large and didn’t stop or just rammed it really good. Obviously, we may never know how the tailgate got so bent out of shape but it doesn’t really matter how or why. It’s broke, so Keith gets to fix it. Personally, I think he has been rather ingenious in his problem solving skills on this project since we don’t have the money to spare on getting a professional restoration job. Plus, this makes it more fun, right? As a side note, Keith is debating about a new spare tire fixture since the current style will not allow for opening and closing the rear window (well, open yes but getting it back closed will prove more difficult). So, if we return the spare to its original position, then we won’t be able to access the back or we won’t be able to have the top and windows. It would be one or the other. Something to work on for another day.
Alright, the tailgate is as straight as Keith is able to make it with his primitive tools. Now it’s time to install the new hardware. This, too, was not as simple or as easy as it seems. So, what else is new? The instructions say to just pop the two halves (poles) into each other. They should just snap together. Yeah, right. Just snap. No problem. Wrong again. After working by himself for awhile and unable to snap the two halves together, he called me to come out and help. The two of us (meaning 80% his strength and 20% my strength) still couldn’t get the pieces to slid into each other. At this point, Keith gets his wrenching cargo hold belt (or whatever the real term is called) and places it around the poles. I do my best to keep the poles lined up while he ratchets and, after a couple of slips of the belt, voila! We have the two pieces together. Great! Oh wait, we have the middle section to do now. Drats. Here we go again. But, we are triumphant in the end! We aren’t gonna let any stinkin’ hardware hold us back. Not after we’ve come as far as we have.
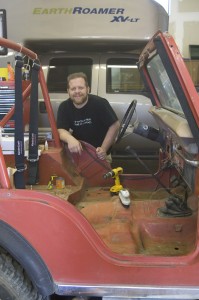
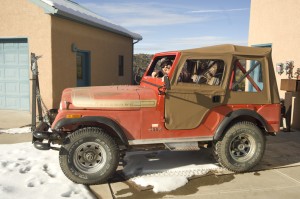 Tailgate is straight, hardware is in place and now Keith can put on the top. I don’t recall any problems in this area but I’m sure he will correct me if I’m wrong. It looks so good! By the way, in the daylight picture, you can really tell the difference in the paint job and see how much it has faded over time. The color by the windshield frame and the hood are the same color but the hood is faded from years of being outside. Eventually, we will get to the outside body work but it will have to wait. Speaking of windshields, you will notice ours is gone now, hence Keith poking his head outside of it. Don’t worry, we have a new one now but that’s a tale for another day. It’s starting to look really spiffy, if I do say so myself.
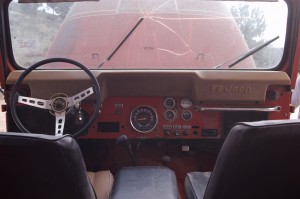
PART NINE: The final event (until more time and funds come our way). After 6 plus months, we have reached the, temporary, end of our tale. This will be the last installment for awhile. The good news is we get to test all of Keith’s hard work by towing the Jeep behind our RV for a little trip soon. I will do my best to remember to stop by here and let you know how it went. FYI, it is now insured and soon to be registered.
Let’s get on with it already. The last part that Keith installed was a new windshield. This was a bit tricky but went better than Keith expected. I was ready to help anytime he might need it but he was able to “get er done” all by himself. After removing the old windshield, which was badly cracked, he painted the frame and did some measuring. Then, per recommendation either by internet or glass instructions, he used a rope to gently ease the new glass into place. I’m not sure how easily this went but Keith did mention it went better than he thought it would. Somehow, he placed the rope around the glass then pulled it toward him, I think, until it popped into the frame. Part of the reason he was able to do it by himself, as everything else he read stated it would take 2 or 3 people, is because he had the frame off the Jeep and on the ground. This gave him more leverage and working space. All help he found on the internet discussed one or two people holding the frame to keep it from falling forward onto the hood while the other person actually installed the glass. Keith didn’t have to worry with that.
So, the Jeep now has a new gas tank, new wire harness, new fuel and oil sending units, new top and doors, new mirrors (but we think we need to add a rear view mirror), new windshield, new seats and seat belts and some new interior paint. Still lots of work left to do but this is a great start! I am so excited about it! It still has an electrical leak somewhere that Keith will spend the next week trying to find but it runs and is safer and even starting to look better.
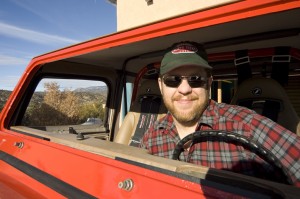 Thank you for stopping by and reading about our Jeep evolution. Be sure to check back from time to time to see if we have added anything new. I hope you enjoyed our little tale and maybe even provided some help or insight into any restoration projects you may be working towards. Cheers!
UPDATE 3-6-10: Yesterday, Keith found the battery leak. At least, he’s about 80% sure he’s found it. It’s the alternator! There is a current flowing through it that should not be. He thinks maybe the diode is out so it’s no longer a one way flow of electricity. There could be something else going on, in addition, but there is definitely something wrong with the alternator. HOWEVER, he can’t replace it because he can’t get the bolt off. It is rusted on, welded on, something. But, it won’t budge. He even took a blow torch to it, briefly, and nothing. It’s looking like we will have to take the Jeep into a dealer to see if they have better tools or options for removing the bolts. But, hey, at least we think we’ve found the problem.
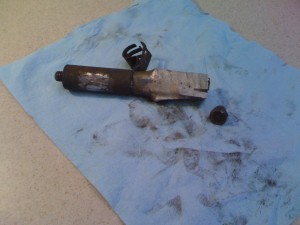
UPDATE 6-15-2010: OK, Keith only thought he found the battery leak. After replacing the alternator, there still seems to be some sort of drain on the battery. Therefore,for the time being, we will continue to remove the battery cable to prevent killing it until we can isolate the drain. So, I bet you’re wondering how Keith ever got the old alternator off. Well, it’s quite a story, as has most of this restoration been. After purchasing and using P B Blaster, Keith was able to get the threads loose from the engine but the spacer bushing and the alternator bracket were so fixed to the bolt that he still couldn’t turn the bolt. It, essentially, was one unit rusted / welded together. At this point, Keith took a reciprocating saw (and three metal blades) to cut the alternator off the bolt and, finally, had to cut the bolt head off just to get it off the engine bracket.
Now, we begin the search for a bolt. After going from store to store, beginning with the local Jeep dealer, we are striking out. Nobody seems to have the right size bolt. Who would have thought this would be such a problem? At the next to the last store, the clerk recommended trying NAPA auto parts. Voila! They have a bolt. It’s a tad long but Keith can work with that. Prior to checking out, the clerk says to Keith, “I bet you need to get that bushing off, don’t you?” The clerk takes the welded bolt and bushing and says he’ll be right back. After about 30 min, he returns with bushing and bolt separated. Yeehaw! Keith can get to work now replacing the alternator and, hopefully, solving all our electrical problems.
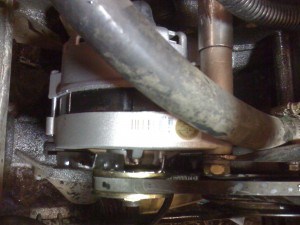 But, wait, there’s more. Keith gets the new alternator in place and takes another reading with his volt meter. Houston, we have a problem. There are still 12 volts and 6 amps circulating through the wiring with everything turned off. Well, I guess it wasn’t the alternator after all. What to do, what to do? Allowing some time to pass while Keith ponders the situation, he returns to his volt meter and diagrams. If it’s not the alternator, he must have something wired wrong. He measures and tests and studies and comes to the conclusion that the S wire coming off the volt regulator is wired improperly. He has it going to the battery via the fuse box. This explains the burned wire he found and why, after smelling smoke, he noticed the oil gauge was fried. Oopsie! Keith corrects the wiring issue, takes another volt reading and appears to be successful. There are no rogue volts or amps. Whew! The next step is to replace all the gauges and hope, with the new alternator and proper wiring now, that they work. This will be a good thing as just the other day, while driving around town, the Jeep stalled on us. To make a long story short we ran out of gas because the indicators don’t work and we are guess-timating how many miles we travel and how much gas remains in the tank. We guessed wrong. Thanks to our dear friend for giving us a tow back home. We now have AAA, too.
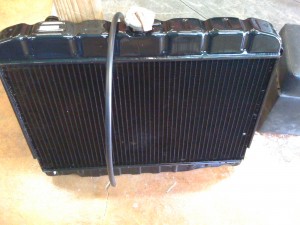 What is that leaking from the Jeep? The answer would be the radiator. Initially, Keith thought it was a matter of not having an overflow tank. He would soon discover the leak is from the radiator itself. Oh dear. The dilemma here is do we purchase a new radiator or attempt to save some bucks and simply have it repaired? Upon doing research, Keith finds a reputable repair shop whose primary purpose is repairing radiators. Sounds perfect. We are able to save some moolah as Keith has no problems or issues removing the radiator himself to drop off at the shop. The man thinks he can have it ready by tomorrow. Excellent! But, tomorrow comes and tomorrow goes and no call. Either the man is a flake or there is a problem. After reading this blog, what do you think? You guessed correctly if you said there must be a problem. The man calls on the 2nd or 3rd day to report he is unable to repair it. Apparently, he found and patched the hole where it was leaking. Then, he did a pressure test. He found another hole. He patched another hole and did another test. It popped another leak. He patched a 3rd hole, tested again and, guess what? It popped another leak. At this point, the man takes his probe and, gently, pokes at various places on the radiator only to find it crumbling around him. I guess we won’t be repairing this radiator after all. The man orders a new radiator for us, we pick it up and Keith installs it. So much for saving money.
UPDATE 5-15-11: Last month we drove to Dallas, with plans to go further but those plans got cancelled, and on the return journey we stopped at Palo Duro Canyon for some camping. We towed the Jeep behind the RV the entire way, hoping to use it in the canyon for some sight seeing. We pulled into our campsite, unhooked the Jeep and started it up. Well, not exactly. We only thought we were going to start the Jeep. Let’s just say it did not occur to us to unhook the battery terminal. In order to keep the steering wheel loose while towing, the key needs to be in the ignition in the “on” position to unlock the wheels. By not disconnecting the battery, we drained it. Upon returning home, we charged the battery but the Jeep still wouldn’t start. Keith says it tries to turn over, now, so it seems that we did not kill the battery. After much searching, Keith finds the battery, alternator, starter motor, etc all in working order. Since the battery is trying to start the car, Keith decides to test the voltage going to the ignition coil. All appears to be good. Next, he tests across the coil for resistance (measured in ohms, for those that understand any of this). It should read about 1-2 ohms and ours read zero. No measurement at all. Hmm, perhaps the problem is with the ignition coil. The next day, after going into town for the part, Keith replaces the ignition coil and the Jeep starts right up. Bingo! Another part replaced with new. I can’t imagine there is much left to replace but Keith reminds me there is still plenty that could be done. Until that time comes, I’ll savor the joy rides around town and keep my fingers crossed that it works on our next road trip!
Thank you for returning to read the updates on our restoration journey. I will continue to update this blog as Keith continues to make progress, we hope, on the Jeep. Happy Travels!
Link to the photo gallery: Jeep photo gallery
